How to install WordPress?
A beginners guide
Powering over 30% of all websites on the internet WordPress is the biggest and one of the most popular content management system around. Part of its popularity comes from how easy it is to install.
With this guide, even a WordPress novice can install a fresh copy of WordPress in a few minutes.
Things you need before installing WordPress.
Before we can get started, you’ll need a domain name and a reliable hosting package.
We highly recommend Krystal hosting for UK based websites; they offer fantastic support, affordable packages and site speeds that we rarely see on other platforms. Many of their packages also come with a free domain name.
How to install WordPress from cPanel
cPanel is a popular control panel used by many web hosting companies as an easy to use web interface that grants access to many of the webserver utilities.
Hosting companies will often choose which WordPress auto-installer system to use, with many opting for Softaculous or Installatron.
If your cPanel isn’t using Softaculous or Installatron, you can still install WordPress via FTP.
How to install WordPress with Softaculous
Softaculous is a popular auto-installer script that allows you to install many web applications like WordPress within a few clicks.
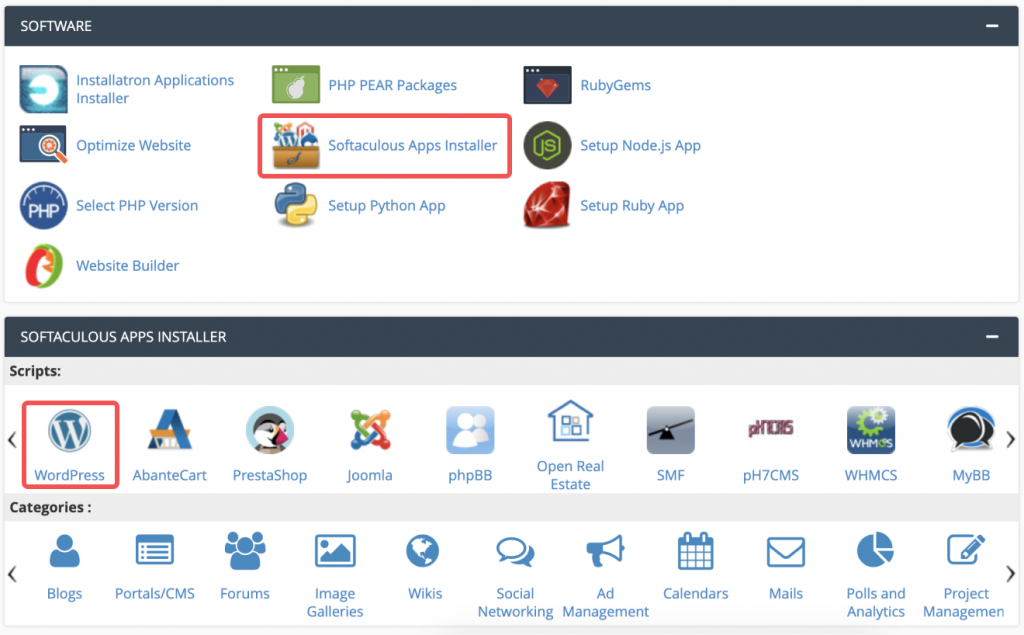
To install WordPress with Softaculous, simply login to your cPanel account and find either ‘Softaculous’ or ‘Softaculous apps installer’.
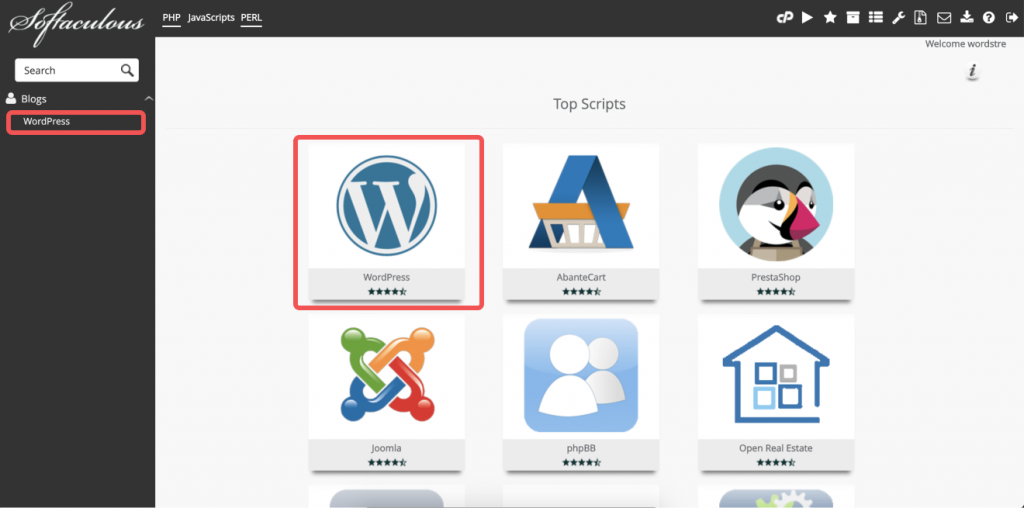
Clicking any of the highlighted buttons will launch the Softaculous installer. Search for ‘WordPress’ and click the result to be taken to the WordPress Installation Overview screen.
Click the little arrow next to the ‘Install’ button and select ‘Custom install’.
Softaculous will now ask you where you’d like to install WordPress and which protocol to use.
You’ll need to choose between http:// or http://www.
If your site has an SSL certificate, then select one of the https:// or https://www.
Next, you’ll need to choose the domain name you’d like WordPress associated with; if you’ve already linked your domain name to your hosting company, you’ll see it in the dropdown menu.
Leave the ‘In Directory’ field blank, unless you’d like WordPress installed in a subdirectory.
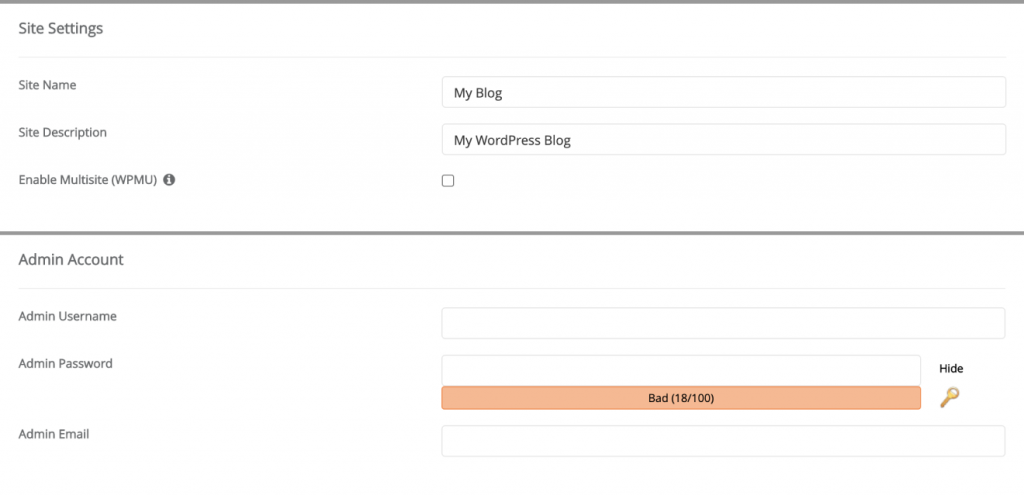
Scrolling down a smidge will show the site settings sections.
Enter the name of your website in the ‘Site name’ and a short description of your site, or company. These can be easily changed later.
Enter the username you’d like associated with the admin account in the ‘Admin Username’ field we highly recommend changing it from admin.
Complete the ‘Admin Password’ field using a strong password (security is vital), and enter the email address you’d like associated with the admin WordPress account.
All the other fields shown on this page are optional, scroll down and click the ‘Install’ button.
Softaculous will begin installing WordPress with your chosen settings, while you are displayed a progress bar. It can take a few minutes, so be sure not to close the window until the installation is complete.
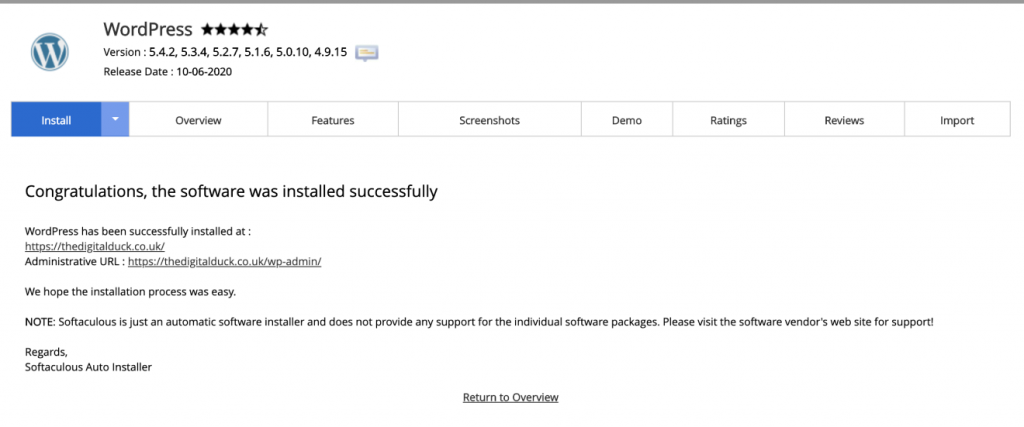
Once completed, you will see a success message and links to your newly installed WordPress site.
How to install WordPress with Installatron
Installatron, like Softaculous, is an auto-installer installation library, which allows you to install various web software quickly and effortlessly.
To begin installing WordPress through Installatron, you should log into your cPanel account and find the ‘Installatron Applications Installer’ button.
Click the ‘Installatron Applications Installer’ button to be taken to the library of software that Installatron can set up.
Use the search bar on the right to search for WordPress; you’ll need to click the enter button on your keyboard for it to submit the search.
Once the results have loaded, you’ll see an Install button a little down the page. Click it to begin the installation process.
The first question it will ask is where to install WordPress. It’s shown as a dropdown listing the available domain names on your account.
We recommend using an https option if you have an SSL certificate.
You can leave the Directory field blank unless you’d like to install WordPress in a subfolder on the server.
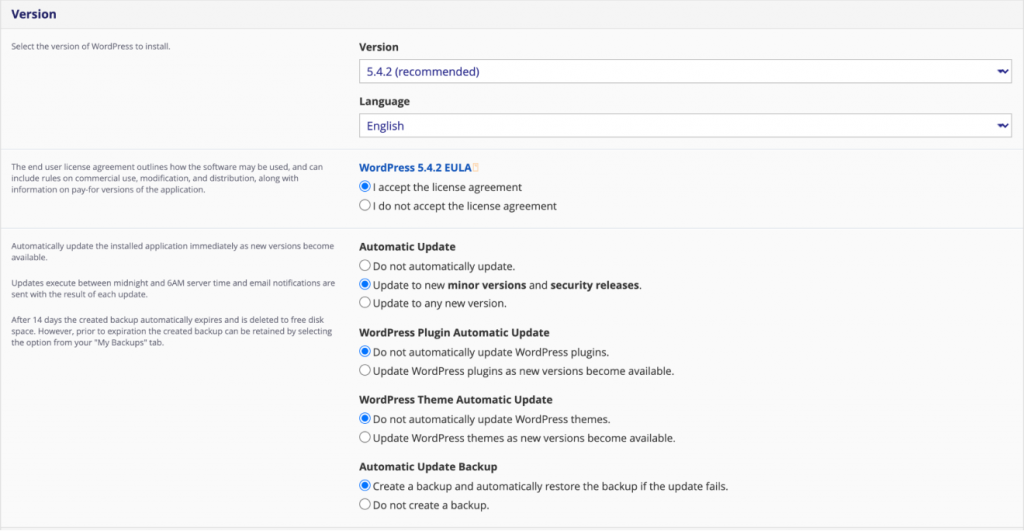
Scrolling down to the next section, allows you to select which version of WordPress to use; we recommend leaving these settings as they are since they provide the best options for peace of mind.
Next is the site settings; starting with the admin login details. You want these credentials to be secure; so avoid using admin as the username, and be sure to create a strong password.
You can make remembering these details much simpler by using a good password manager.
The Administrator email will is how WordPress notifies you if an issue arises, or if you need to reset your password, so be sure to check the email account exists, and that you can easily access it. The website tagline is a short description of your website or business. Multiple WordPress themes and plugins use it, so it’s worth filling it in.
On some systems, you’ll also have the option to enable 2-factor authentication, which will require you to enter a code sent to your email account each time you log in to the site. It’s a great security feature which we highly recommend using if it’s available.
You can also set a limit on how many times someone can fail to login, which is fantastic at securing your site from basic brute force attacks.
Everything else is optional so scroll down to the bottom of the page and click the Install button. It will then show a progress bar. Once installed, you’ll see an overview screen with a few statistics about your new WordPress website along with the links to view and login to the site.
How to install WordPress through FTP
FTP is the standard way to upload files to a web server and is almost definitely available on your hosting platform. Which is why installing WordPress with FTP is the most reliable way; even if it means a little more work.
- Connect to the server through FTP
- Download the WordPress files from https://wordpress.org/download/
- Extract the WordPress files to your computer.
- Upload the WordPress files within the extracted WordPress folder to the server.
- Using your web browser, navigate to your web hosting control panel.
- Find the MySQL Databases button and click it.
- Create a new Database, taking note of the name you give it.
- Create a new Database user, taking note of the username and password.
- Assign the new Database user to the new database, granting all permissions.
- Navigate to your websites domain name in your web browser.
- Go through the steps shown, filling in the database credentials and site information.
The first thing you’ll need to do is connect to your web server through FTP. You can connect to FTP directly from Finder on Mac, or Explorer on Windows.
Once connected, you’ll see all the files on your server and can begin installing WordPress.
Download the WordPress files to your computer by heading over to https://wordpress.org/download/
The WordPress files come compressed as a zip, so you need to extract them.
Once extracted, you have a new folder called WordPress, open the folder and select all the files.
Go to your FTP Client from earlier and navigate the file structure to your websites root folder which is usually /public_html.
Drag the selected WordPress files into the window, which will begin the upload process.
After the upload has completed, we’ll need to create a database on your web server. To do this, navigate to your hosting control panel from your web browser and look for a button that says MySQL databases or something similar.
After clicking the MySQL databases button, you will see a field to create a new database. Enter a name for your database and click ‘create database’.
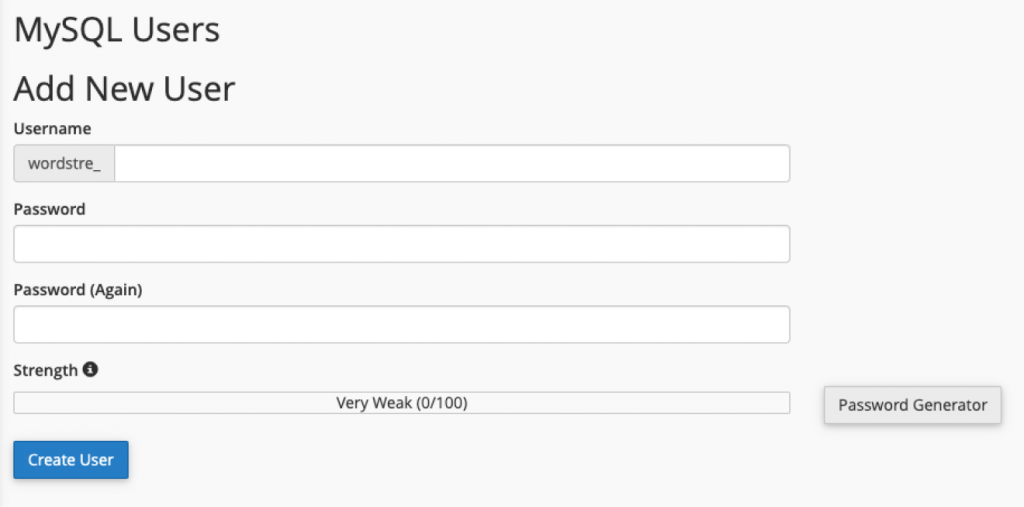
Once created, click the ‘go back’ button and scroll down to the ‘Add New User’ section. Enter the username and password for the database user and make a note of them for later. Click the ‘Create User’ button to finalise the new user.
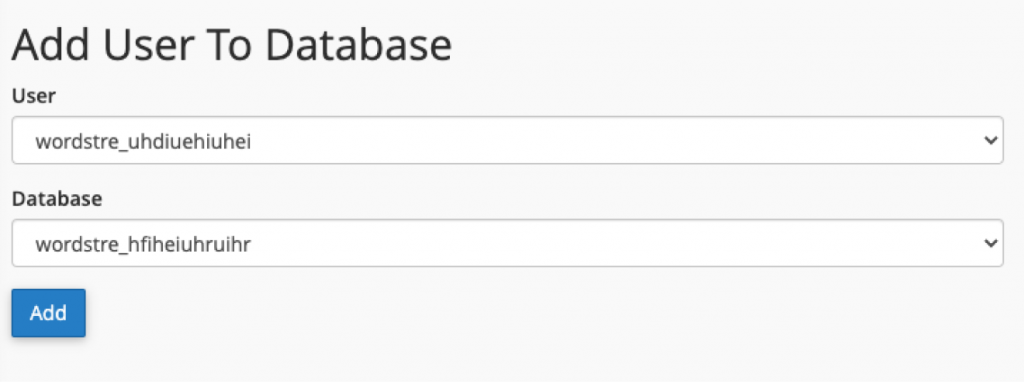
Once the user has is created, click the ‘Go Back’ button again and scroll down to the ‘Add User To Database’ section.
Using the provided dropdown boxes, select the newly created user and database and click ‘Add’.
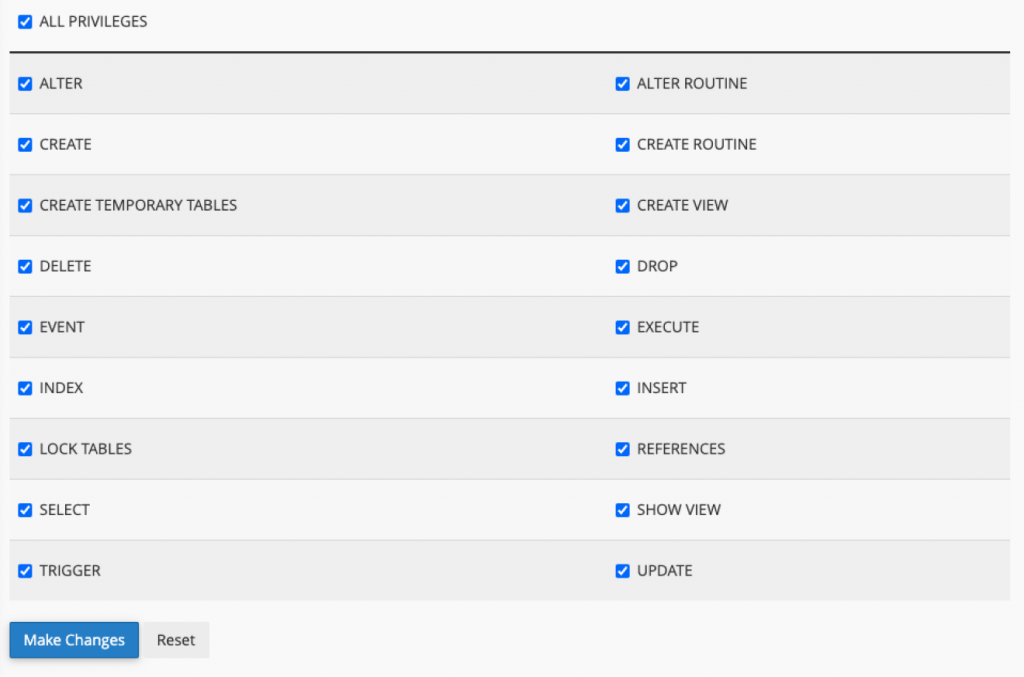
On the next screen, check the ‘ALL PRIVILEGES’ box followed by clicking the ‘Make Changes’ button.
With that, the WordPress files are on the server, and the database is ready. The only thing left to do set up WordPress.
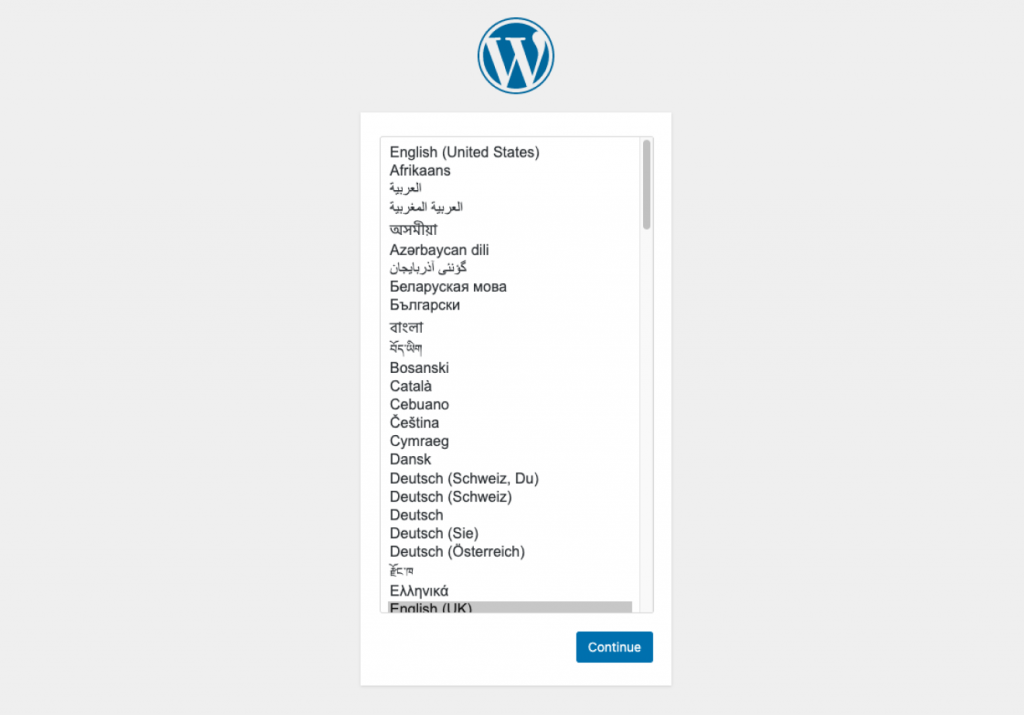
Use your web browser to navigate to your website, and you’ll see a list of languages, select the one you’d like your version of WordPress to use and click continue.
The next screen will explain the next step in the process. The general idea is “fill in the database credentials we made earlier, and WordPress will create a config file to make the website use them. Click the ‘Let’s Go’ button to move onto the next step.
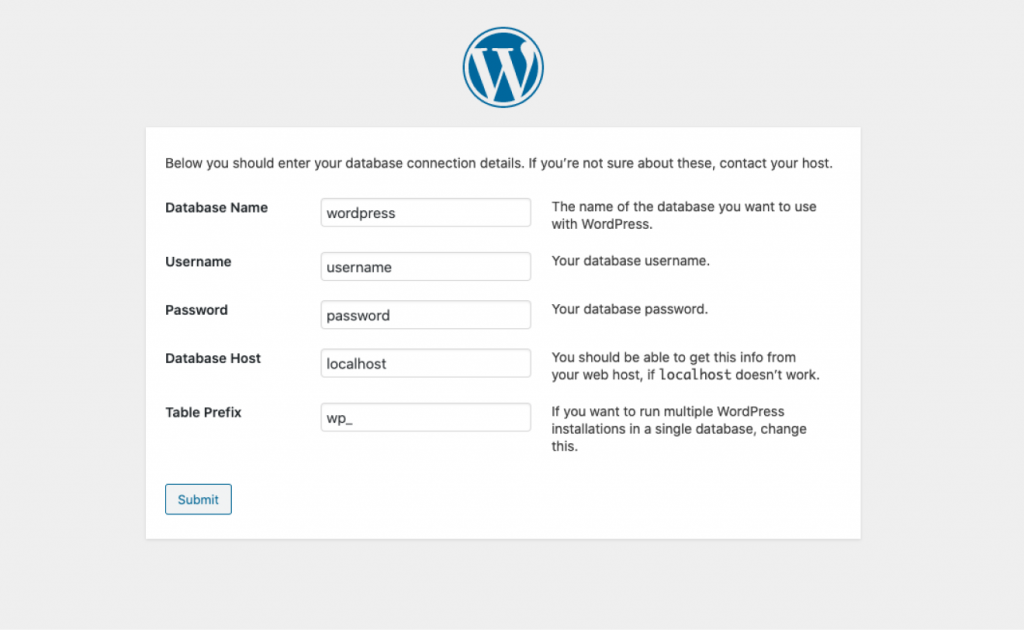
Using the database credentials from earlier enter the Database Name, Database Username and Database User Password into the similarly named fields.
For a lot of web hosting packages, the database host can remain set to localhost. On the off chance that it’s not localhost, your hosting provider should have given you the correct information to enter here.
The Table Prefix field is for websites that intend to install multiple instances of WordPress; you can leave this as wp_ or change it to anything you’d like. Click the ‘Submit’ button to continue to the next step.
Assuming that the database set up was successful, the next screen you see will be another informational message confirming the database is up and running. Click the ‘Run the installation’ button to reach the final step of the process.
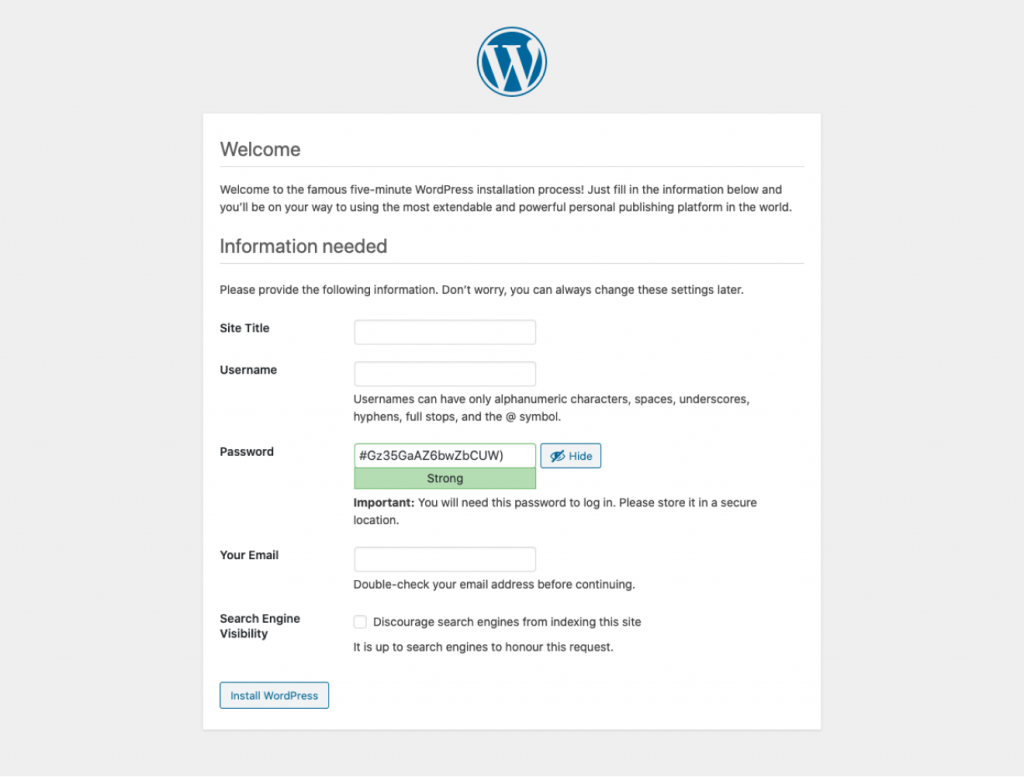
Enter the site title, which we’d recommend being your business or blog name.
The Username, Password and Email fields will make up the administrator account to login to WordPress so be sure everything is correct, secure and that you can remember them.
We highly recommend using a good password manager.
Leave the Search Engine Visibility field unchecked. Otherwise, your site might not appear on Google, Bing or the other search engines.
Finish the installation process by clicking the ‘Install WordPress’ button.
How to install WordPress on Bluehost
Bluehost is a popular hosting platform that’s officially recommended by WordPress. As one of the largest hosting companies in the world, they offer packages starting from £2.22 a month.
Installing WordPress on Bluehost is a breeze, in-fact, the WordPress Hosting package will automatically install WordPress for you. The only thing to do is log in.
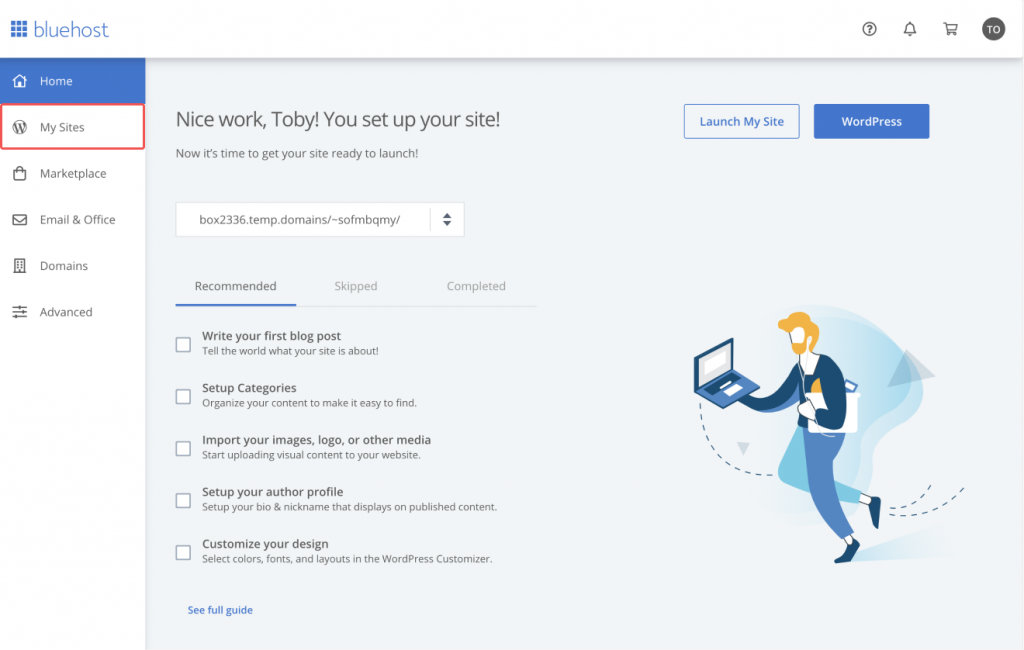
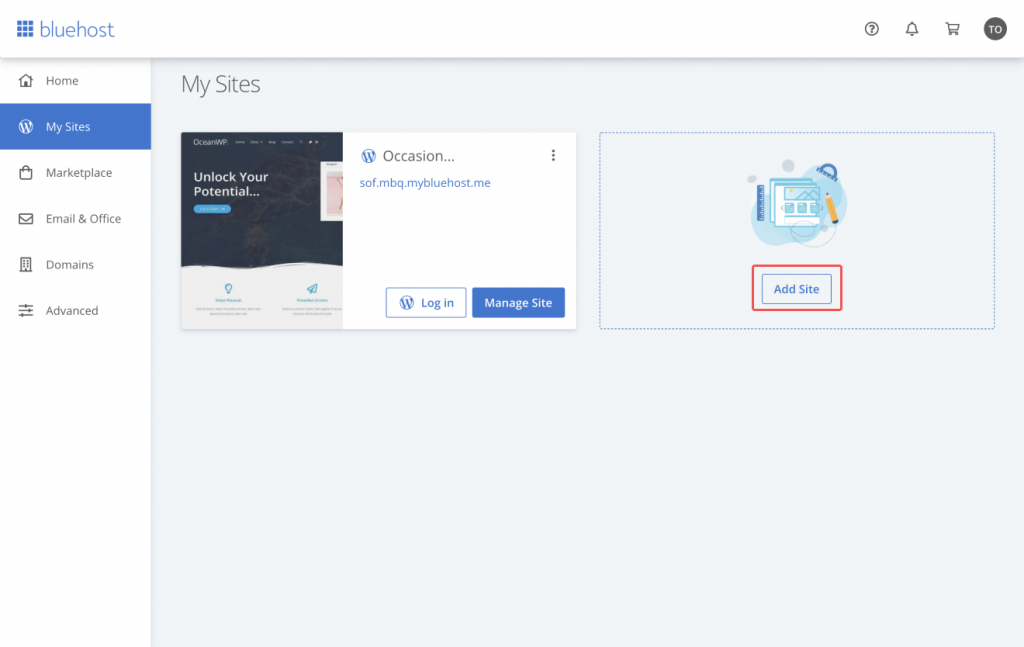
On the higher tier hosting packages, Bluehost lets you install WordPress on multiple domain names. To start this process, log in to your Bluehost control panel and click the ‘My sites’ navigation button.
On the ‘My Sites’ screen there, will be an ‘Add Site’ button, click it to start the installation walkthrough, then click the ‘Use WordPress’ button.
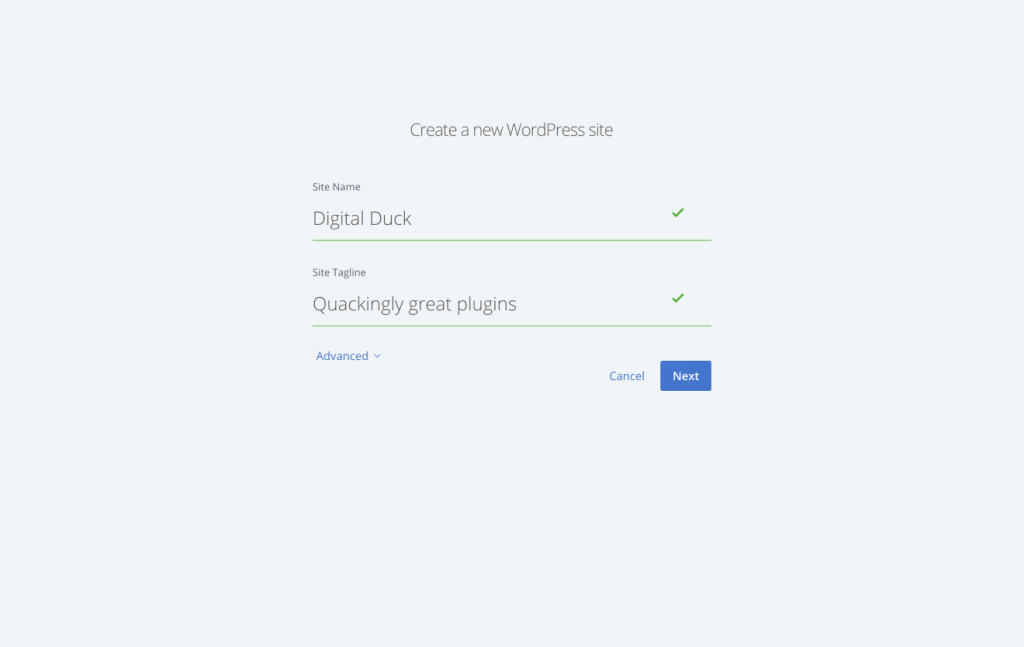
Complete the ‘Site Name’ field by entering the name you’d like your website to use; we recommend your business or blog name.
The ‘Site Tagline’ field should be a concise description of your business or blog. A little like “Quackingly great plugins”.
Click the blue next button to continue the process.
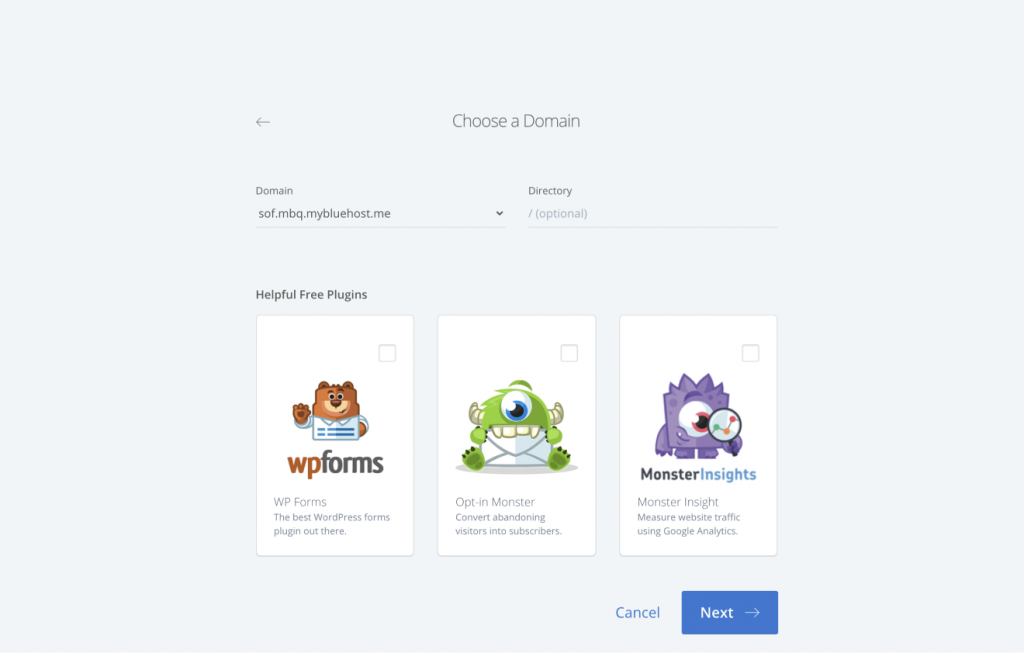
The next screen will show you a field listing the domain names associated with your Bluehost account. Select the domain name you’d like to install WordPress on; the ‘Directory’ field can be left blank.
Scrolling down the page reveals a handful of useful plugins you might want to preinstall on the site. Select any you’d like and click the next button.
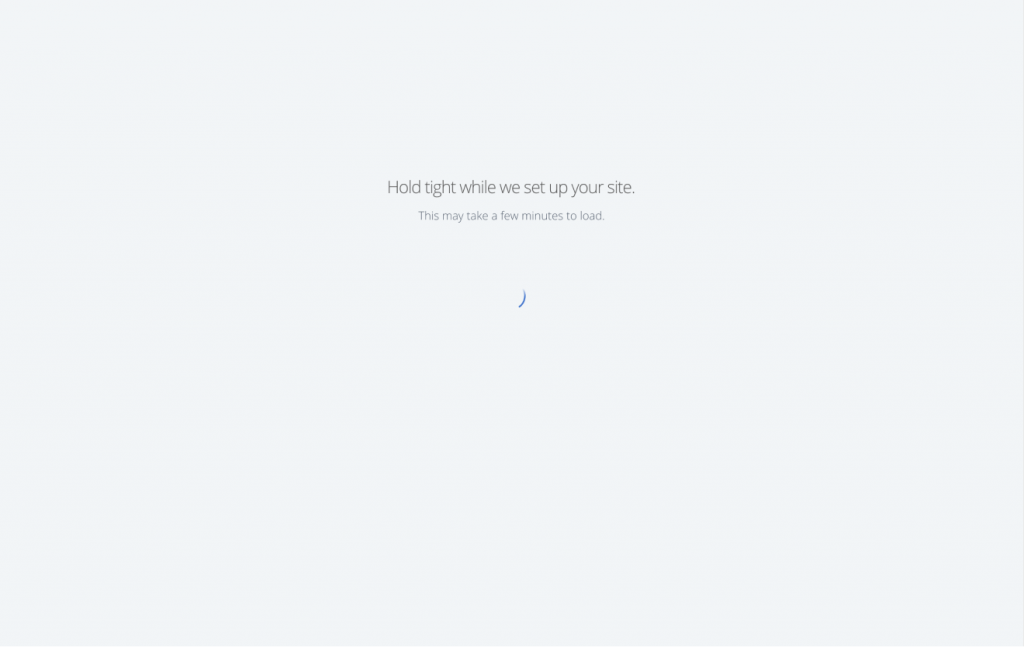
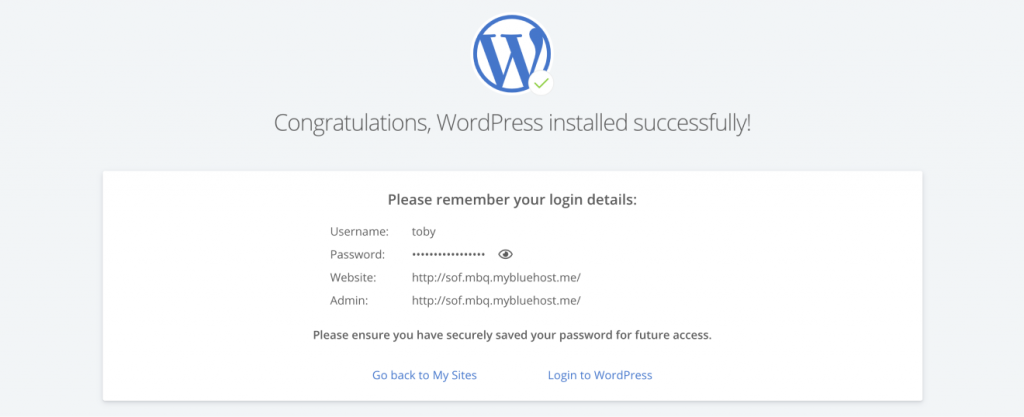
Bluehost will now set up your WordPress site, which may take a few minutes. Once completed, you will see a success message along with your WordPress login details.
Now you know how to install WordPress on several popular platforms. Let us know if there are any other hosting providers you’d like us to add to our list.


